Verify a phone number
Verify a phone number: set up Masked Calling
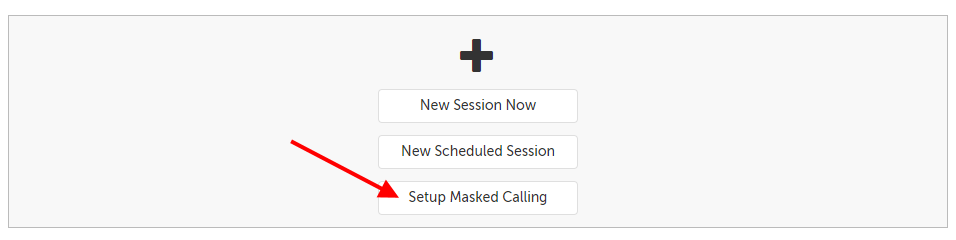
1. On a dashboard, click the "Setup Masked Calling" button, underneath the scheduling buttons.
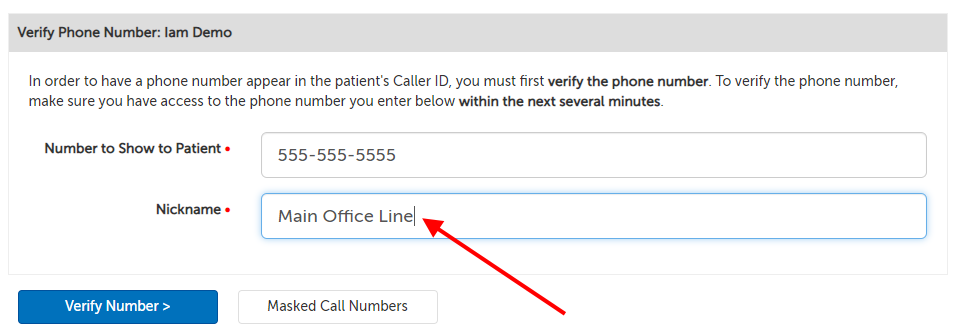
2. On the next page, enter the phone number you own into the field "Number to Show to Patient". This is the number that will be used for your Caller ID. For the example below, we are using the phone number "555-555-5555".
- Once verified, this phone number will be shared across your organization account, and can be used by any other Host or Account Administrator. Only include a phone number meant for organization use.
- The dash marks between numbers are added automatically.
- If the phone number you want to verify has an auto-attendant, please contact us at [email protected] for a separate arrangement.

3. Enter a Nickname that will be recognizable to you and any other Host or Account Adminstrator. In the example below, we are using the Nickname, "Main Office Line".
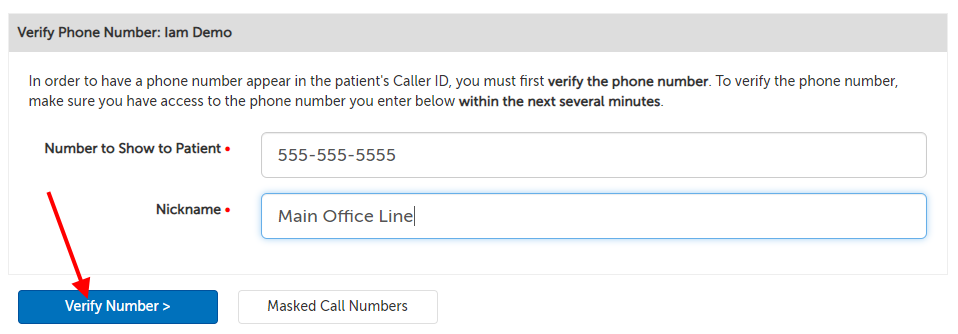
4. Be sure you are ready to access the phone number entered, and then click the "Verify Number >" button.
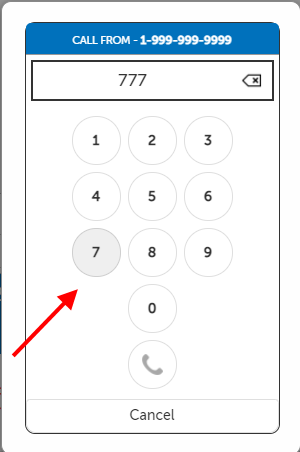
5. This will trigger a call to the number you entered, and the page will automatically reload to display a verification code.
When answering the call, an automated voice will say: Hello. Please enter your 6-digit validation code.
Enter the 6-digit code displayed on the page (in the example below, it is being pointed to by the red arrow).
- If your main line requires ringing to an extension before someone can pick up, please contact our support team at [email protected] to schedule a time to go through the verification process together.

6. After entering the code correctly, an automated voice will say: You have successfully validated your phone number. You may now use [phone number entered] as the caller ID for outgoing phone calls. Good bye.
7. The page will automatically redirect to display the new verified phone number, now ready for use.
- If you have other organization account holders, this number will also be set up for them automatically for use.

Verify a phone number: add additional phone numbers
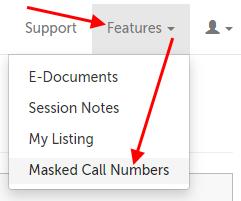
1. While logged in as an Account Administrator or Host, click on the "Features" tab and select "Masked Call Numbers".
2. On the next page, enter the phone number you own into the field "Number to Show to Patient". This is the number that will be used for your Caller ID. For the example below, we are using the phone number "999-999-9999".
- Once verified, this phone number will be shared across your organization account, and can be used by any other Host or Account Administrator. Only include a phone number meant for organization use.
- The dash marks between numbers are added automatically.
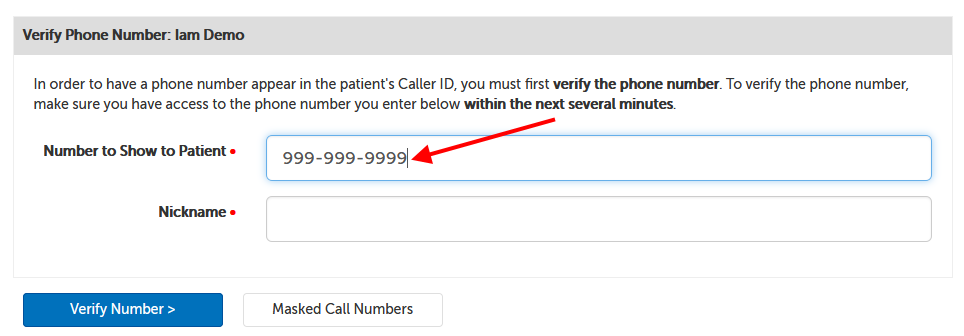
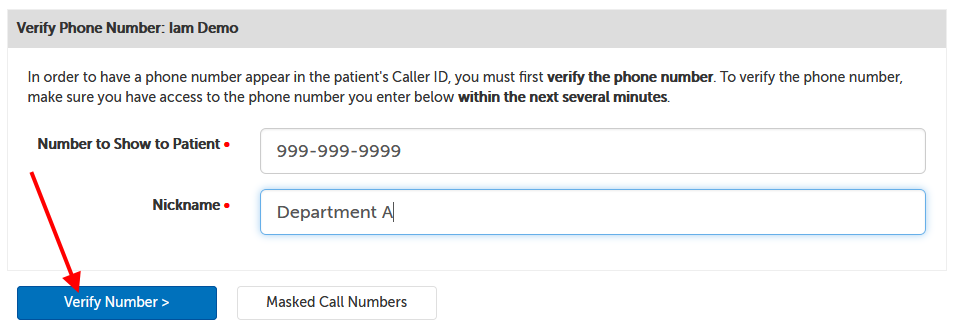
3. Enter a Nickname that will be recognizable to you and any other Host or Account Adminstrator. In the example below, we are using the Nickname, "Department A".

4. Be sure you are ready to access the phone number entered, and then click the "Verify Number >" button.
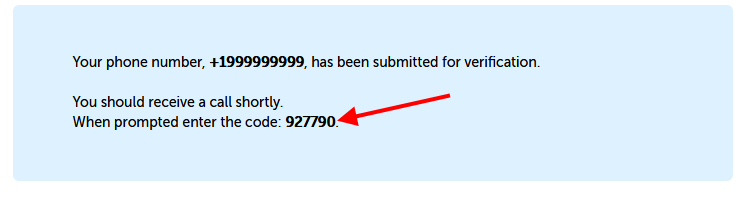
5. This will trigger a call to the number you entered, and the page will automatically reload to display a verification code.
When answering the call, an automated voice will say: Hello. Please enter your 6-digit validation code.
Enter the 6-digit code displayed on the page (in the example below, it is being pointed to by the red arrow).
6. After entering the code correctly, an automated voice will say: You have successfully validated your phone number. You may now use [phone number entered] as the caller ID for outgoing phone calls. Good bye.
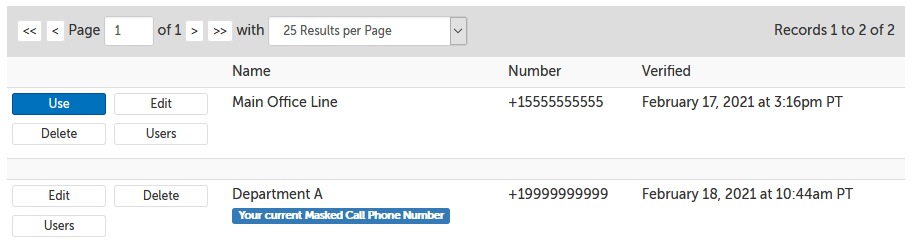
7. The page will automatically redirect to display the new verified phone number, and will be your new default number.
- If you have other organization account holders, this number will also be set up for them automatically for use.
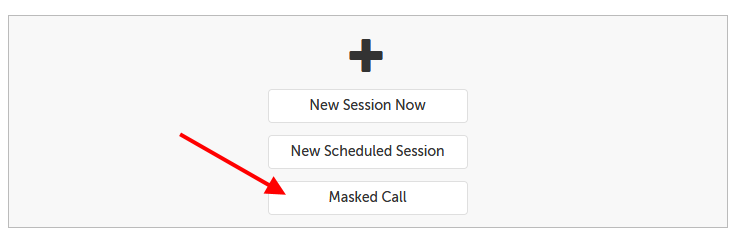
Start a Masked Call
Start a Masked Call: using a current contact
1. While on your own dashboard, click the "Masked Call" button, underneath the scheduling buttons.
2. A dial pad will appear on the screen. Start typing the name of a contact with a saved phone number in your SecureVideo account, and select their name from the autofill.

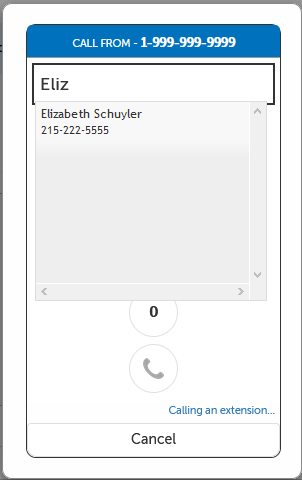
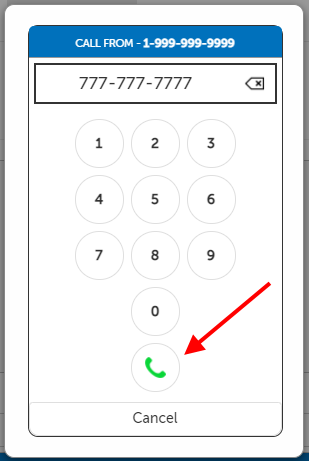
3. The phone icon will light up as green. Tap on that icon to start the call.
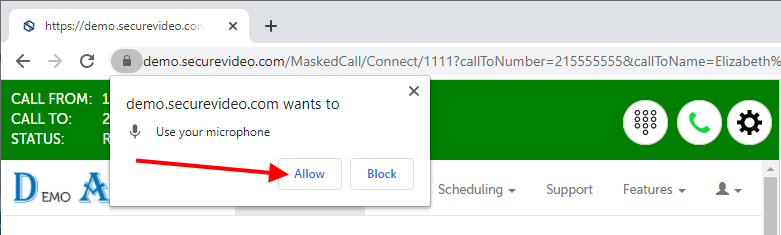
3a. If your browser prompts you for microphone permission, click to allow. This will start your call.
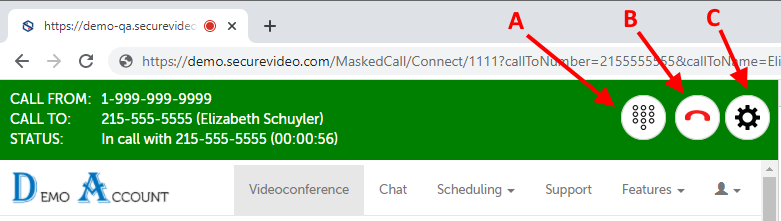
3. A timer will keep track of the duration of the call at the top of the screen, as well as a reminder of what phone number is displaying as your caller ID (the "Call From" number) and the phone number and contact name that you're currently in a call with.
- A: Click the number pad icon if you need to dial a number, asterisk (*), or the pound sign (#) during the call.
- B: When done, click the red phone button in the upper right hand corner to hang up the call.
- C: Click on the Settings icon to change the microphone used for your call.
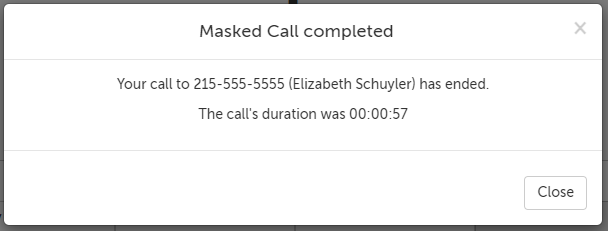
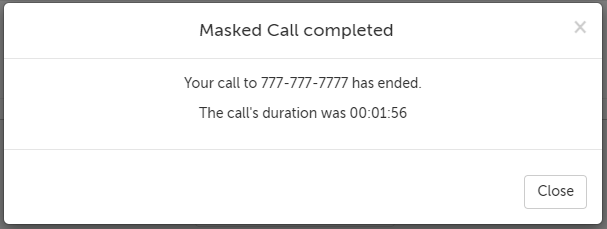
5. A confirmation message that the call has ended will appear, also with the contact number and name, and call duration.
Start a Masked Call: enter a new phone number
1. While on your own dashboard, click the "Masked Call" button, underneath the scheduling buttons.
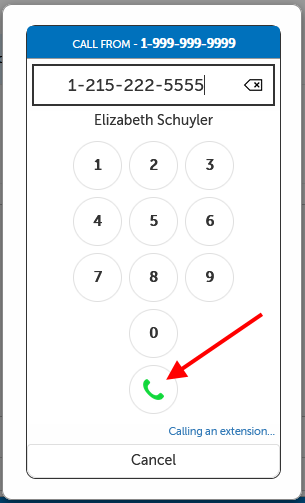
2. A dial pad will appear on the screen. Use the numbers on the dial pad to tap the phone number you'd like to call.
3. After you have finished entering the number, the phone icon will light up as green. Tap on that icon to start the call.
3a. If your browser prompts you for microphone permission, click to allow. This will start your call.
3. A timer will keep track of the duration of the call at the top of the screen, as well as a reminder of what phone number is displaying as your caller ID (the "Call From" number) and the phone number and contact name that you're currently in a call with.
- A: Click the number pad icon if you need to dial a number, asterisk (*), or the pound sign (#) during the call.
- B: When done, click the red phone button in the upper right hand corner to hang up the call.
- C: Click on the Settings icon to change the microphone used for your call.
5. A confirmation message that the call has ended will appear, also with the contact number and name, and call duration.
Start a Masked Call: from scheduled session
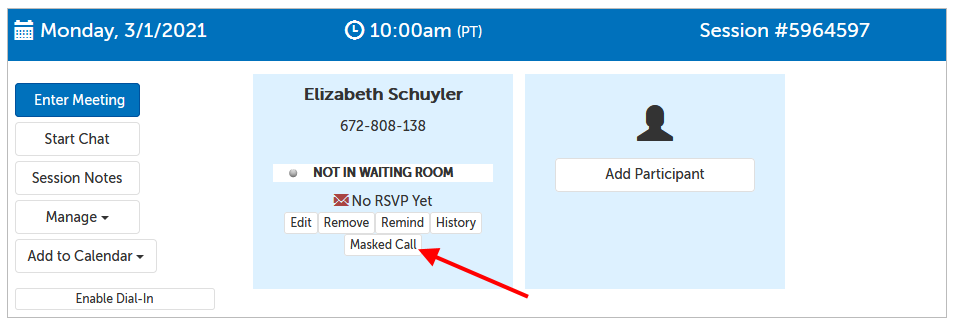
1. To make a call related to one of the sessions you are hosting, click on the "Masked Call" button underneath the name of the participant in the session.
2. If there is a saved phone number for the participant in your contacts, a dial pad will appear with the number pre-filled. Tap on the green phone icon to start the call.
2a. If your browser prompts you for microphone permission, click to allow. This will start your call.
3. A timer will keep track of the duration of the call at the top of the screen, as well as a reminder of what phone number is displaying as your caller ID (the "Call From" number) and the phone number and contact name that you're currently in a call with.
- A: Click the number pad icon if you need to dial a number, asterisk (*), or the pound sign (#) during the call.
- B: When done, click the red phone button in the upper right hand corner to hang up the call.
- C: Click on the Settings icon to change the microphone used for your call.
4. A confirmation message that the call has ended will appear, also with the contact number and name, and call duration.
Change default Masked Call phone number
Change default Masked Call phone number for yourself
1. While logged in as an Account Administrator or Host, click on the "Features" tab and select "Masked Call Numbers".
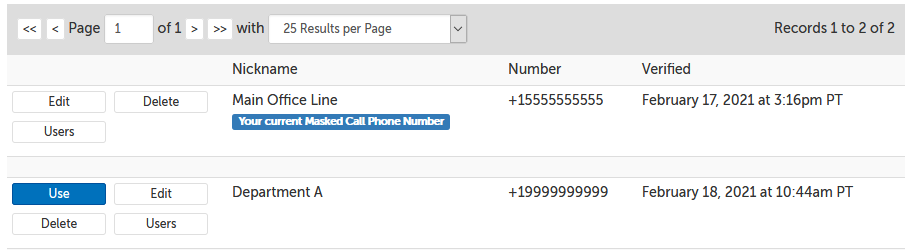
2. Scroll down to the list of verified numbers, and click the "Use" button of the phone number that you would like to make your default.
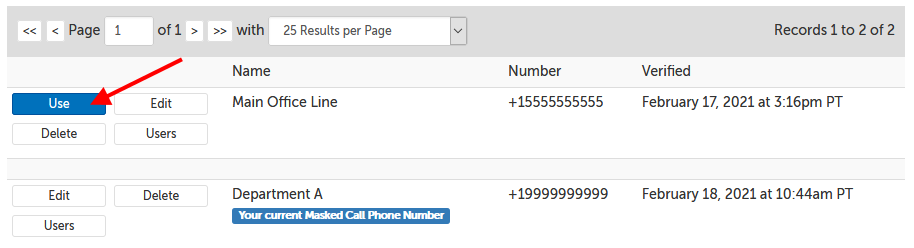
3. The page will refresh, and if you scroll down to look at the numbers again, you will see the label "Your current Masked Call Phone Number" on the number just selected.
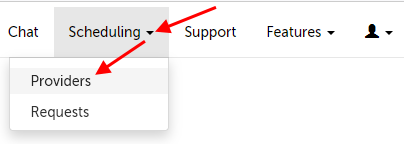
Change default Masked Call phone number on behalf of someone else
*This method is for if the Host has not yet set a default number for themselves. The logged in user must have an Account Administrator role, or a Scheduler role with access to the Host they are editing.
1. Click on the "Scheduling" tab and then select "Providers".
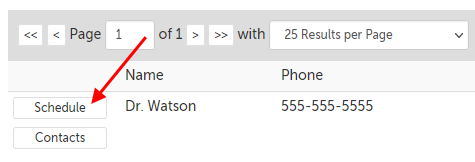
2. Click on the "Schedule" button of the Host that you would like to set a number for.
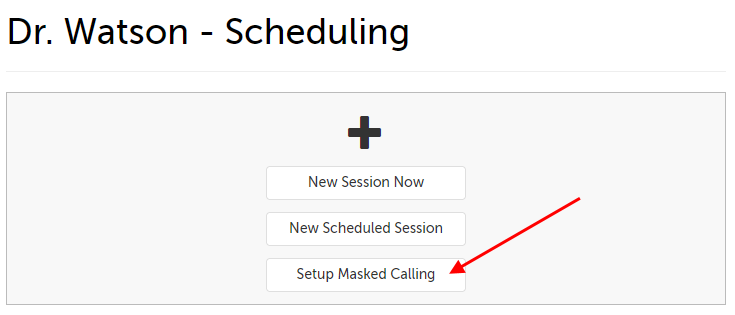
3. On that Host's scheduling dashboard, click the "Setup Masked Calling" button.
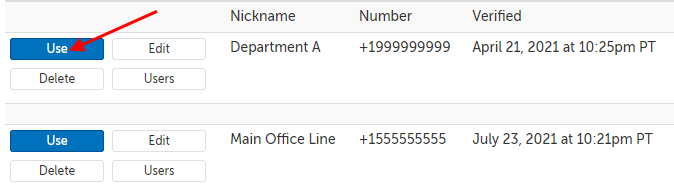
4. Click the "Use" button next to the desired phone number for this Host. This change will save automatically.
This article was last reviewed by our Support team on July 23, 2021.